コンテンツのCRUD
この章ではwebサービスにおけるコンテンツ作成の基本原則CRUDを紹介する。
CRUDとはあらゆるコンテンツは5つのアクションで制御できるという思想に基づいて作られた設計思想である。
5つアクションとはこれらのことである。
- index: コンテンツ一覧の取得
- show: コンテンツ詳細の取得
- create: コンテンツの作成
- update: コンテンツの更新
- destroy: コンテンツの削除
Postコンテンツ
何が主体となるコンテンツかはサービスによって異なる。
Twitterなら「ツイート」になるし、Facebookなら「投稿」になるし、ブログなら「記事」になる。 なので、コンテンツ自体を表す名称はサービスによって異なってしまうが、ここでは統一的に「Post」と呼ぶ。
Postの作成にはScaffold経由で作成する。
scaffoldコマンドの一般式はこのようになっている。
bin/rails g scaffold モデル名 カラム名1:型 カラム名2:型
Post作成の場合はこのようにする。Postはタイトルとその内容、あと誰が作成したか判別するuser_idを持たせる。 具体的なサービスでPostを作る場合は、必要なカラムをここに記述する。 なお、後からでも追加はできるので最低限user_idとcontentさえあれば問題ない。
bin/rails g scaffold Post user_id:integer title:string content:text

Running via Spring preloader in process 56343
      invoke  active_record
      create    db/migrate/20220627064935_create_posts.rb
      create    app/models/post.rb
      invoke  resource_route
       route    resources :posts
      invoke  scaffold_controller
      create    app/controllers/posts_controller.rb
      invoke    resource_route
このコマンドだけでマイグレーションファイルの作成、モデルの作成、コントローラーとCRUDアクションの作成、ルーティングをやってくれる。
マイグレーションをDBに適応させる。
bin/rails db:migrate
ここで作成されたものはまだログインユーザーのチェック、UserモデルとPostモデルのリレーションの設定はまだ行われていないが、ひとまずコミットする。
git add .
git commit -m "Create a Post scaffold"
CRUD APIを叩く
本格的にReactでフロントを作る前にここでコンテンツの作成と取得、編集と削除を試す。
Railsのルーティングを見ると、postに関する項目が加わっている。
bin/rails routes

Prefix Verb    URI Pattern                      Controller#Action
posts  GET     /posts(.:format)                 posts#index
       POST    /posts(.:format)                 posts#create
post   GET     /posts/:id(.:format)             posts#show
       PATCH   /posts/:id(.:format)             posts#update
       PUT     /posts/:id(.:format)             posts#update
       DELETE  /posts/:id(.:format)             posts#destroy
create
まずは、POST /posts(.:format) posts#createを叩きpostレコードを作成する。
なお、posts controllerにログイン認証をしていないので、どこからでも作成できる。
curl -X POST http://localhost:3001/posts -d 'post[title]=hello&post[content]=This is a first post'
うまく処理されればこのような値が返ってくる。
{"id":1,"user_id":null,"title":"hello","content":"This is a first post","created_at":"2022-06-27T07:15:54.941Z","updated_at":"2022-06-27T07:15:54.941Z"}
データベースを見にいく。
bin/rails db

mysql> select * from posts\G
*************************** 1. row ***************************
        id: 1
   user_id: NULL
     title: hello
   content: This is a first post
created_at: 2022-06-27 07:15:54.941434
updated_at: 2022-06-27 07:15:54.941434
1 row in set (0.00 sec)
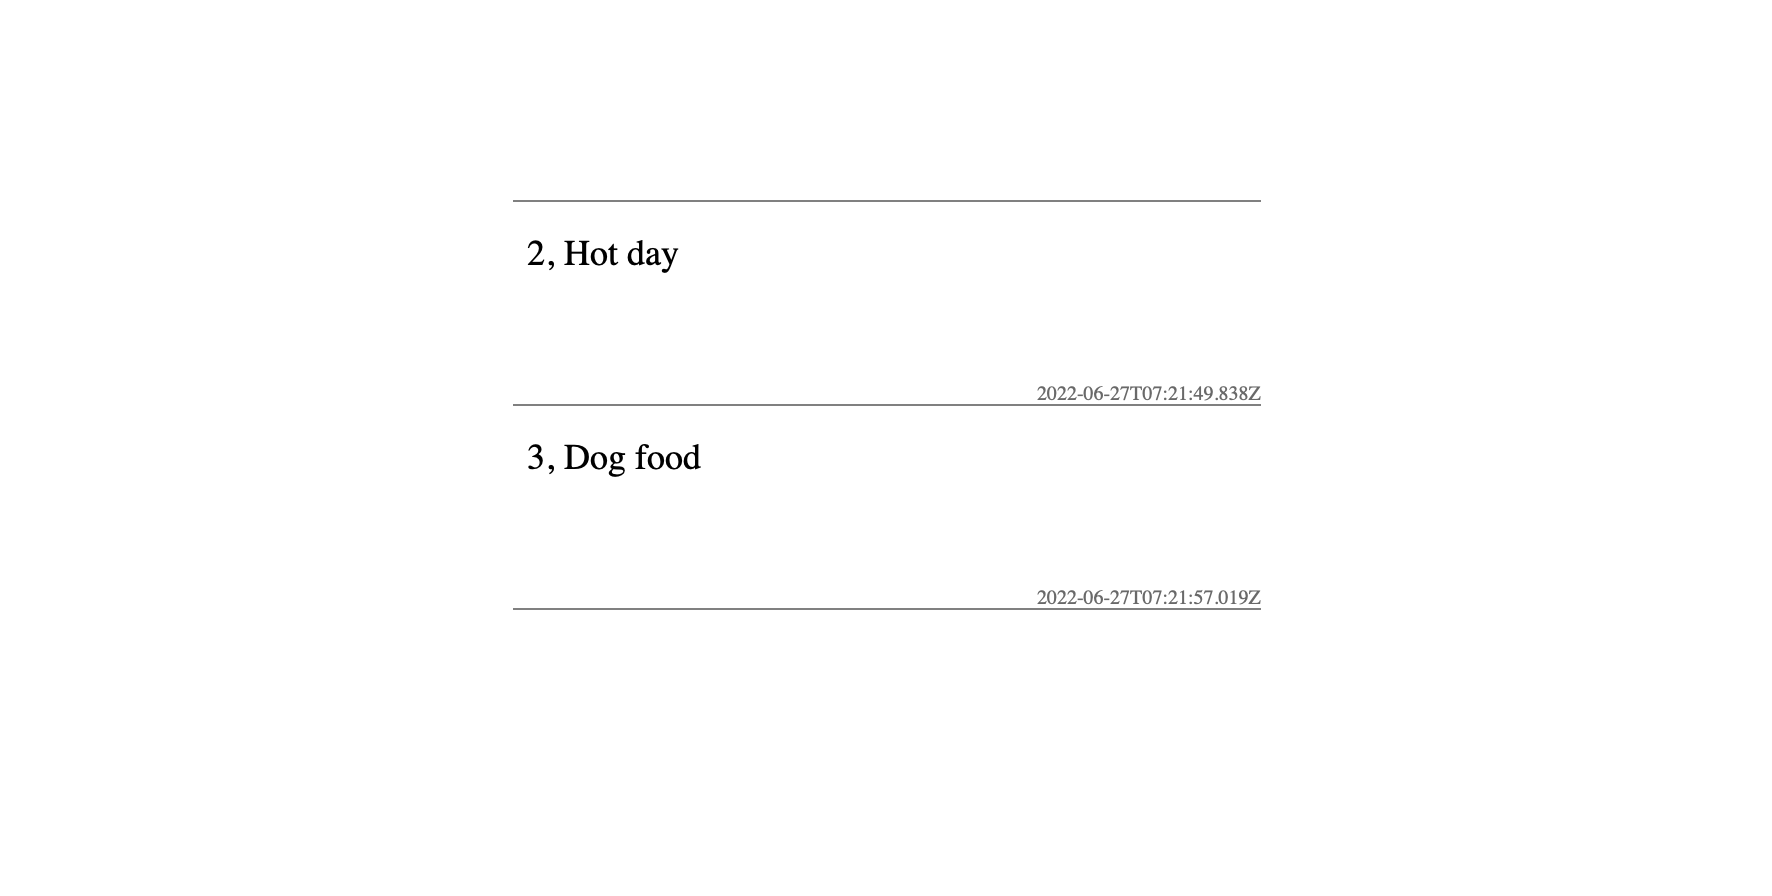
サンプルなので3つほど作っておく。
curl -X POST http://localhost:3001/posts -d 'post[title]=Hot day&post[content]=Amazing'
curl -X POST http://localhost:3001/posts -d 'post[title]=Dog food&post[content]=A cat hates doggy food'
index
Post controllerのindexGET /posts(.:format) posts#indexはpostの一覧を取得できる。
内容が空だろうが1つだろうが配列として返ってくる。
curl http://localhost:3001/posts
このような値が返ってくる。
[{"id":1,"user_id":null,"title":"hello","content":"This is a first post","created_at":"2022-06-27T07:15:54.941Z","updated_at":"2022-06-27T07:15:54.941Z"},{"id":2,"user_id":null,"title":"Hot day","content":"Amazing","created_at":"2022-06-27T07:21:49.838Z","updated_at":"2022-06-27T07:21:49.838Z"},{"id":3,"user_id":null,"title":"Dog food","content":"A cat hates doggy food","created_at":"2022-06-27T07:21:57.019Z","updated_at":"2022-06-27T07:21:57.019Z"}]
このサンプルではtitleからcontentまでpostの全ての値が入っているが、 それだとjsonのサイズが大きくなりすぎてしまう。
一般にindexで返ってくる情報はidとtitleなどそのオブジェクトが最低限識別できるくらいの情報量のみ返すようにする。
show
showGET /posts/:id(.:format) posts#showはindexとは異なり詳細なpostの情報を渡してあげる。
エンドポイントで:idとなっているのは目的のpost情報を表すidを渡してあげる。
curl http://localhost:3001/posts/1
{"id":1,"user_id":null,"title":"hello","content":"This is a first post","created_at":"2022-06-27T07:15:54.941Z","updated_at":"2022-06-27T07:15:54.941Z"}
update
updateはidと一緒にカラム渡して、情報を更新できる。
エンドポイントが2つあるのはそれぞれHTTPメソッドが異なるだけである。 どちらを利用しても同じように変更が可能。 一般にPUTを利用することが多い。
PATCH /posts/:id(.:format) posts#updatePUT /posts/:id(.:format) posts#update
このコマンドではidが1のtitleを変更している。
contentは変更しないのでカラムを渡さなければ、更新されない。
curl -X PUT http://localhost:3001/posts/1 -d 'post[title]=hello(Edited)'
このような値が戻って来れば正常に処理されている。
{"title":"hello(Edited)","id":1,"user_id":null,"content":"This is a first post","created_at":"2022-06-27T07:15:54.941Z","updated_at":"2022-06-27T07:39:17.238Z"}
DBも見てみる。
bin/rails db

mysql> select * from posts where id= 1\G
*************************** 1. row ***************************
        id: 1
   user_id: NULL
     title: hello(Edited)
   content: This is a first post
created_at: 2022-06-27 07:15:54.941434
updated_at: 2022-06-27 07:39:17.238453
1 row in set (0.00 sec)
destroy
destroyDELETE /posts/:id(.:format) posts#destroyはidを指定して、そのpostを削除する。
curl -X DELETE http://localhost:3001/posts/1
データベースからidが1のpostが削除される。
mysql> select * from posts\G
*************************** 1. row ***************************
        id: 2
   user_id: NULL
     title: Hot day
   content: Amazing
created_at: 2022-06-27 07:21:49.838435
updated_at: 2022-06-27 07:21:49.838435
*************************** 2. row ***************************
        id: 3
   user_id: NULL
     title: Dog food
   content: A cat hates doggy food
created_at: 2022-06-27 07:21:57.019271
updated_at: 2022-06-27 07:21:57.019271
2 rows in set (0.00 sec)
以上でPostのCRUDを全て試してみた。
ユーザー認証の追加
今まではユーザー認証を付けずにposts_controllerのAPIを叩いてきた。
これから試しにcreate、udpate、destroyにはユーザー認証をかける。
app/controllers/posts_controller.rbを開き、class PostsController内に以下を加える。
これは、onlyで指定されたactionが実行される前に認証を行い、認証情報が無いと弾かれる。
それと、認証しているかどうかで@postのセットの仕方が変わるのでset_postからshowを削除する。
before_action :authenticate_user!, only: [:create, :update, :destroy]
before_action :set_post, only: [:update, :destroy]
indexアクションはorder(created_at: :desc)を加えて、取得順が最近作られたものから始まるようにする。
表示する時に上の方に最近投稿したものが表示された方が見やすいためである。
def index
 @posts = Post.all.order(created_at: :desc)

  render json: @posts
end
showアクションがset_postから外れたので編集する。
def show
  @post = Post.find(params[:id])
  render json: @post
end
createアクションではuser_idを保存できるようにする。
加えて、エラーを返す時にfull_messagesを投げるようにする。 Railsのエラー文は独特で、エラーのテキストが部分的に未完な状態で送られて、フロント側でカラム名とエラー文を自分で結合させるという処理をする。 これは面倒なので、API側であらかじめ結合させて返すようにする。
def create
  @post = Post.new(post_params)
  @post.user_id = current_user.id
  if @post.save
    render json: @post, status: :created, location: @post
  else
    render json: @post.errors.full_messages, status: :unprocessable_entity
  end
end
同じようにupdateアクションでもエラー文はフルテキストで返す。
def update
  if @post.update(post_params)
    render json: @post
  else
    render json: @post.errors.full_messages, status: :unprocessable_entity
  end
end
最後にset_post関数でコンテンツを作成した本人のみがpostを取得できるようにする。
def set_post
  @post = Post.find_by(id: params[:id], user_id: current_user.id)
end
ついでにUserモデルとPostモデルでリレーションをはっておく。
app/models/user.rbにはこれを追加。Userは複数のPostを持つというのを意味する。
has_many :posts
app/models/post.rbにはbelongs_toを追加。これはpostは唯一1つの作成者であるUserを持つを表す。
belongs_to :user
ここでコミット。
git add .
git commit -m "Add User auth to the posts controller and make a relation between User and Post"
Post 一覧の表示
ここからはNext.jsのフロントからこれらを操作できるように開発を進める。 この章ではトップページにpostの一覧を表示してみる。
Next.jsプロジェクトでpostを取得するAPIのファイルを作成する。
touch lib/api/post.js
posts#indexを叩く関数を作成。
import client from './client'
import Cookies from 'js-cookie'

export const getPosts = () => {
  if (!Cookies.get('_access_token') || !Cookies.get('_client') || !Cookies.get('_uid')) {
    return client.get('/posts')
  } else {
    return client.get(`/posts`, {
      headers: {
        'access-token': Cookies.get('_access_token') || '',
        client: Cookies.get('_client') || '',
        uid: Cookies.get('_uid') || '',
      },
    })
  }
}
トップページにposts一覧を表示するコードを作成。
import { useState, useEffect } from 'react'
import Head from 'next/head'
import { getPosts } from '../lib/api/post'
import { Box, Text } from '../atomic/'

export default function Home() {
  const [posts, setPosts] = useState([])

  const handleGetPosts = async () => {
    try {
      const res = await getPosts()

      if (res?.data.length > 0) {
        setPosts(res?.data)
      } else {
        console.log('Something went wrong')
      }
    } catch (err) {
      console.log(err)
    }
  }

  useEffect(() => {
    handleGetPosts()
  }, [])

  return (
    <div>
      <Head>
        <title>Create Next App</title>
        <meta name="description" content="Generated by create next app" />
        <link rel="icon" href="/favicon.ico" />
      </Head>
      <main>
        <Box display="flex" alignItems="center">
          <Box mx="auto" mt={120} borderBottomWidth={1} borderColor="gray">
            {posts.map((post) => {
              return (
                <Box key={post.id} position="relative" width={[380, null, 440]} height={[80, null, 120]} borderTopWidth={1} borderColor="gray" py={[16, null, 18]} px={[6, null, 8.5]}>
                  <Box display="flex">
                    <Text color="dimggray" fontSize={[18, null, 21]}>
                      {post.id},
                    </Text>

                    <Text color="black" fontSize={[18, null, 21]} ml={6}>
                      {post.title}
                    </Text>
                  </Box>
                  <Box position="absolute" bottom={0} right={0}>
                    <Text color="dimgray" fontSize={12}>
                      {post.createdAt}
                    </Text>
                  </Box>
                </Box>
              )
            })}
          </Box>
        </Box>
      </main>
    </div>
  )
}
git add .
git commit -m "Create a Posts index page"
Postの作成
posts#createAPIを叩く、createPost関数を作成する。
export const createPost = (params) => {
  if (!Cookies.get('_access_token') || !Cookies.get('_client') || !Cookies.get('_uid')) return
  return client.post('/posts', params, {
    headers: {
      'access-token': Cookies.get('_access_token') || '',
      client: Cookies.get('_client') || '',
      uid: Cookies.get('_uid') || '',
    },
  })
}
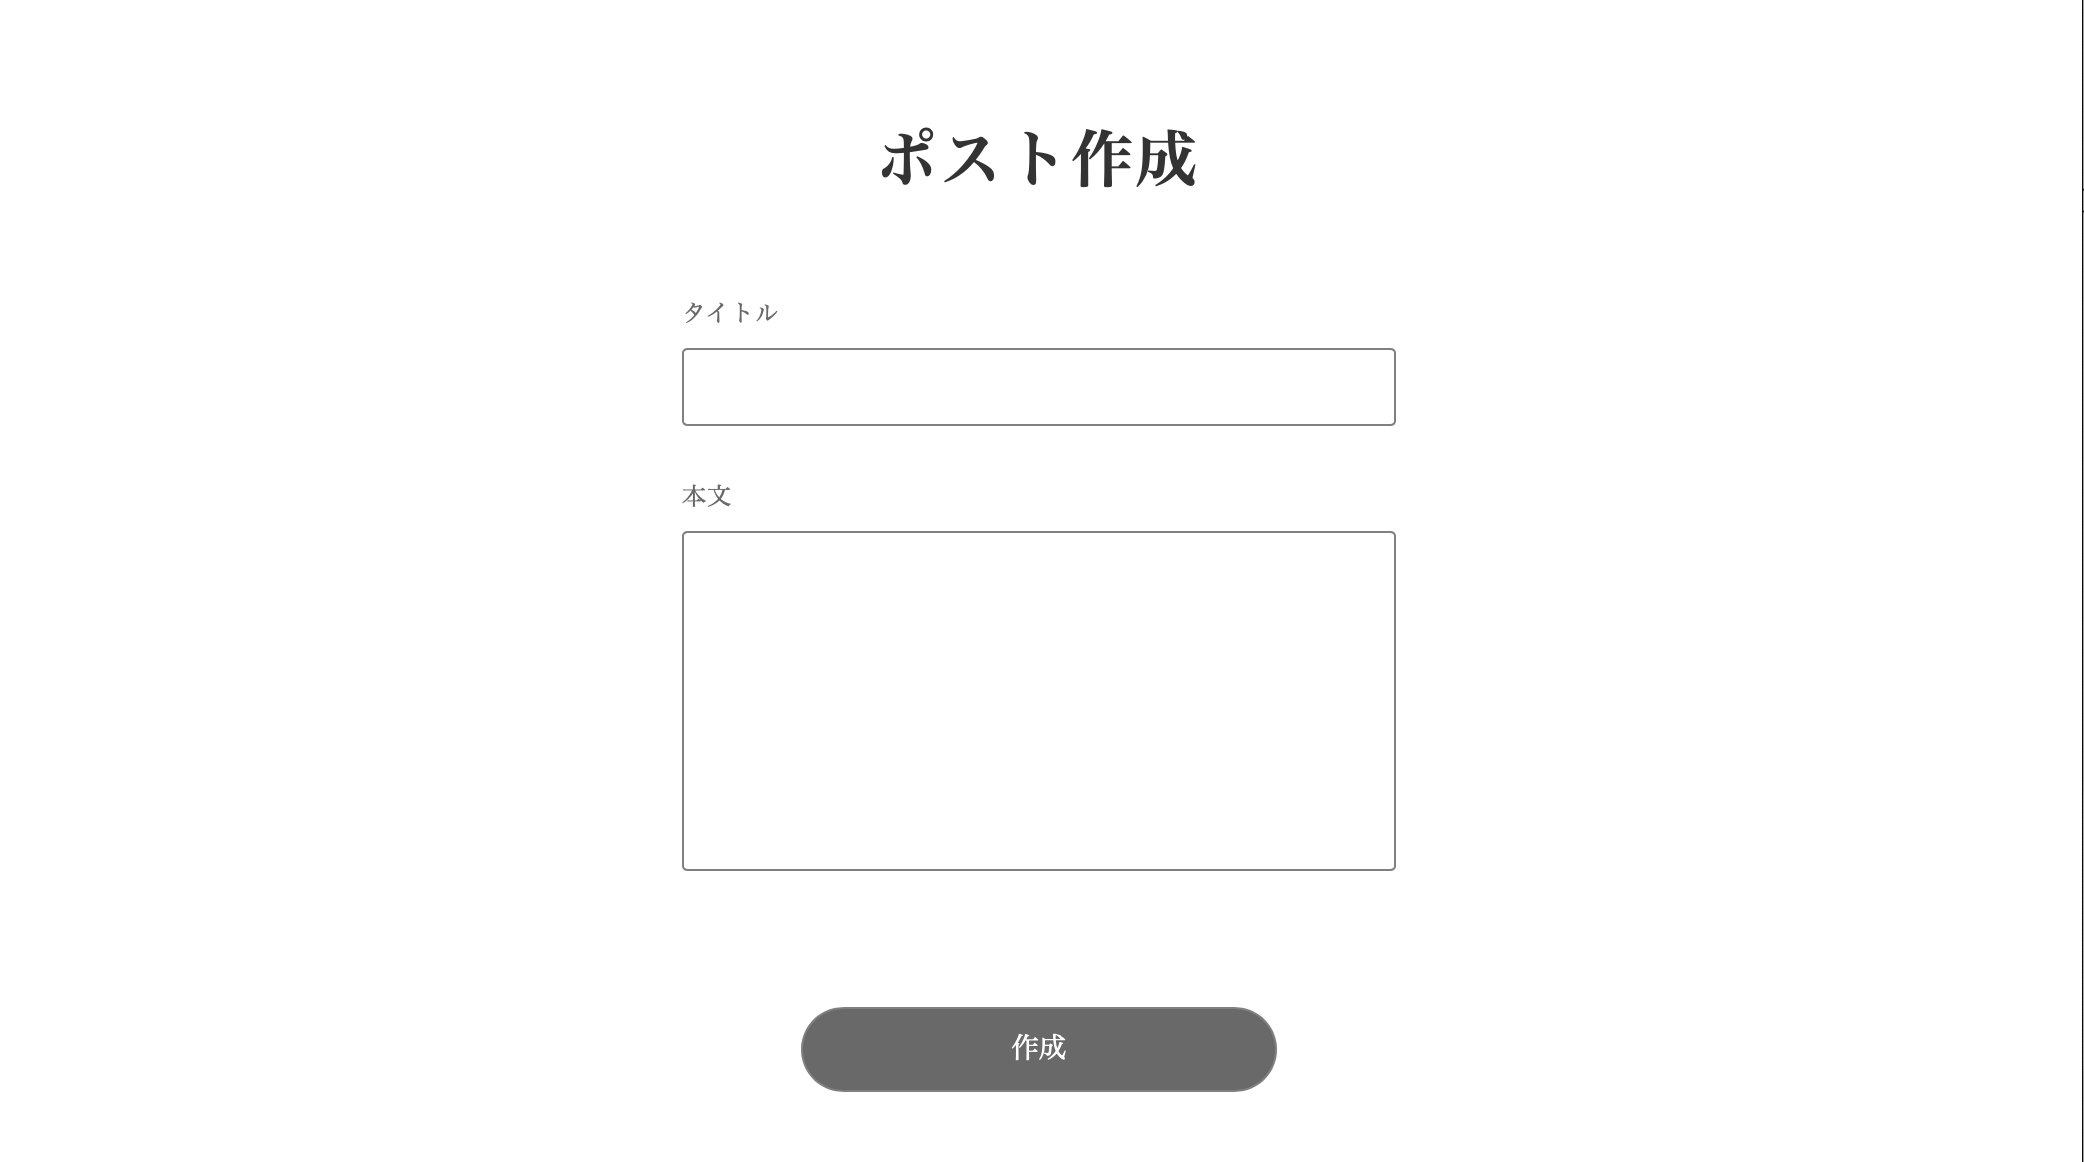
新しいpostを作成するためのnewページを作成。
mkdir pages/posts
touch pages/posts/new.jsx
newページにコードを書き込む。 特に新しいところはないので、全てをここにまとめておく。
import Head from 'next/head'
import { useState, useContext } from 'react'
import { useRouter } from 'next/router'
import { useForm } from 'react-hook-form'
import { Text, Box, Clickable, TextField, TextArea, ThreeDots, Alert } from '../../atomic/'
import { createPost } from '../../lib/api/post'
import { AuthContext } from '../_app.js'

export default function PostsNew() {
  const [animation, setAnime] = useState(false)
  const router = useRouter()

  const [notifications, setNotifications] = useState([])
  const createNotification = (message) => setNotifications([...notifications, { id: Math.random(), message }])
  const deleteNotification = (id) => setNotifications(notifications.filter((notification) => notification.id !== id))
  const { isSignedIn } = useContext(AuthContext)

  const {
    register,
    handleSubmit,
    watch,
    formState: { errors },
  } = useForm()

  const onSubmit = async (data) => {
    if (!isSignedIn) {
      createNotification('投稿にはログインが必要です')
      return
    }
    const params = {
      post: {
        title: data.title,
        content: data.content,
      },
    }

    console.log(params)
    setAnime(true)
    try {
      const res = await createPost(params)
      console.log(res)

      if (res.status === 201) {
        console.log('Signed in successfully!')
        router.push('/')
      } else {
        console.log('some thig went wrong')
        createNotification('予期しない問題が発生しました')
      }
    } catch (err) {
      console.log(err)
      createNotification(err.response.data[0])
    }
    setAnime(false)
  }
  return (
    <div>
      <Head>
        <title>新規ポスト作成</title>
        <meta name="description" content="新規ポスト作成" />
        <link rel="icon" href="/favicon.ico" />
      </Head>
      <Box as="main" mt={[60, null, 80]}>
        <Text as="h1" textAlign="center" fontSize={[26, null, 36]} fontWeight={700} lineHeight={['26px', null, '36px']} letterSpacing={[1.3, null, 1.8]} color="#333">
          ポスト作成
        </Text>
        <Box mt={[40, null, 60]} px={[16, null, 0]} width={['100%', 420]} mx="auto">
          <Text fontSize={14} lineHeight="1.71" letterSpacing={0.7} color="dimgray">
            タイトル
          </Text>
          <TextField
            name="title"
            {...register('title', {
              required: true,
            })} height={46} width="100%" borderColor="gray" borderWidth={1} borderRadius={3} py={10} pl={14} fontColor="black" fontSize={16} letterSpacing={0.8} mt={8}
          />
          {'title' in errors && (
            <Text fontSize={12} lineHeight="22px" letterSpacing={0.6} color="red" mt={8}>
              {errors.title?.type === 'required' && 'タイトルは必須です'}
            </Text>
          )}
          <Text fontSize={14} lineHeight="1.71" letterSpacing={0.7} color="dimgray" mt={30}>
            本文
          </Text>
          <TextArea
            name="content"
            {...register('content', {
              required: true,
            })} height={200} width="100%" borderColor="gray" borderStyle="solid" borderWidth={1} borderRadius={3} py={10} pl={14} fontColor="black" fontSize={16} letterSpacing={0.8} mt={8}
          />
          {'content' in errors && (
            <Text fontSize={12} lineHeight="22px" letterSpacing={0.6} color="red" mt={8}>
              {errors.content?.type === 'required' && '本文は必須です'}
            </Text>
          )}
          <Clickable width={[220, null, 280]} height={[44, null, 50]} borderRadius={[44 / 2, null, 50 / 2]} bg="dimgray" color="white" hoverShadow="silver" borderColor="gray" borderWidth={1} display="flex" alignItems="center" justifyContent="center" overflow="hidden" mt={80} mx="auto" onClick={handleSubmit(onSubmit)}>
            {animation ? <ThreeDots bg="white" /> : <>作成</>}
          </Clickable>
        </Box>
        <Box position="absolute" top="15px" right="20px">
          {notifications.map(({ id, message }) => (
            <Alert key={id} onDelete={deleteNotification} id={id}>
              <Box width={320} minHeight={50} borderRadius={7} border="1px solid silver" bg="ghostwhite" px={5.5} py={3} style={{ overflowWrap: 'break-word' }}>
                {message}
              </Box>
            </Alert>
          ))}
        </Box>
      </Box>
    </div>
  )
}
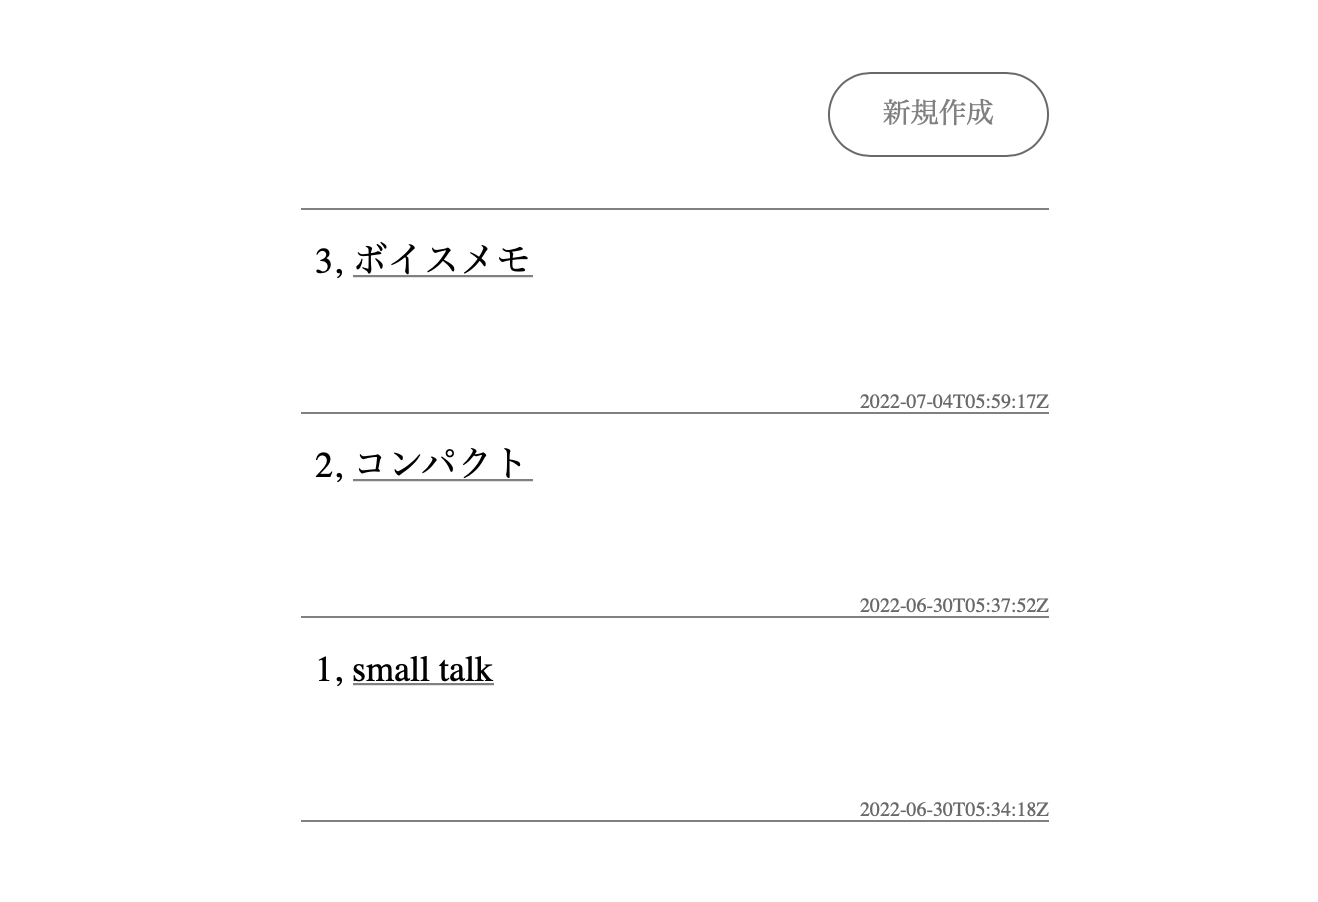
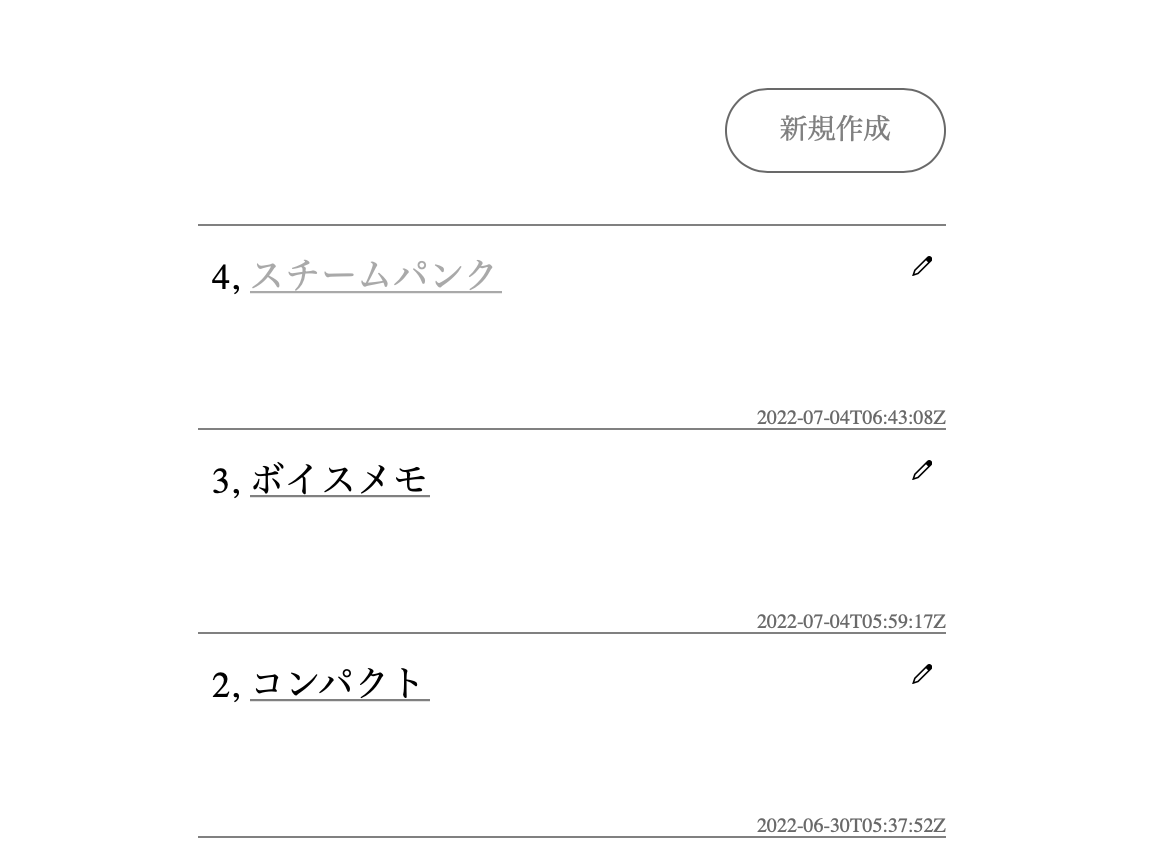
トップページにposts/newへのリンクを作成する。
Link quatumコンポーネントをインポートし、jsxのmainタグの上の方に配置する。
import { Box, Text, Link } from '../atomic/'
...省略...
<main>
  <Box display="flex" alignItems="center">
    <Box mx="auto" mt={120} borderBottomWidth={1} borderColor="gray">
    ...ここから...
    <Box pl="auto" mb={30}>
      <Link href="/posts/new" width={[90, null, 130]} height={[44, null, 50]} borderRadius={[44 / 2, null, 50 / 2]} hoverShadow="silver" borderColor="dimgray" borderWidth={1} display="flex" alignItems="center" justifyContent="center" overflow="hidden" ml="auto">
        <Text color="gray" fontSize={[12, null, 16]}>
          新規作成
        </Text>
      </Link>
   </Box>
   ...省略...

git add .
git commit -m "Create a posts new page"
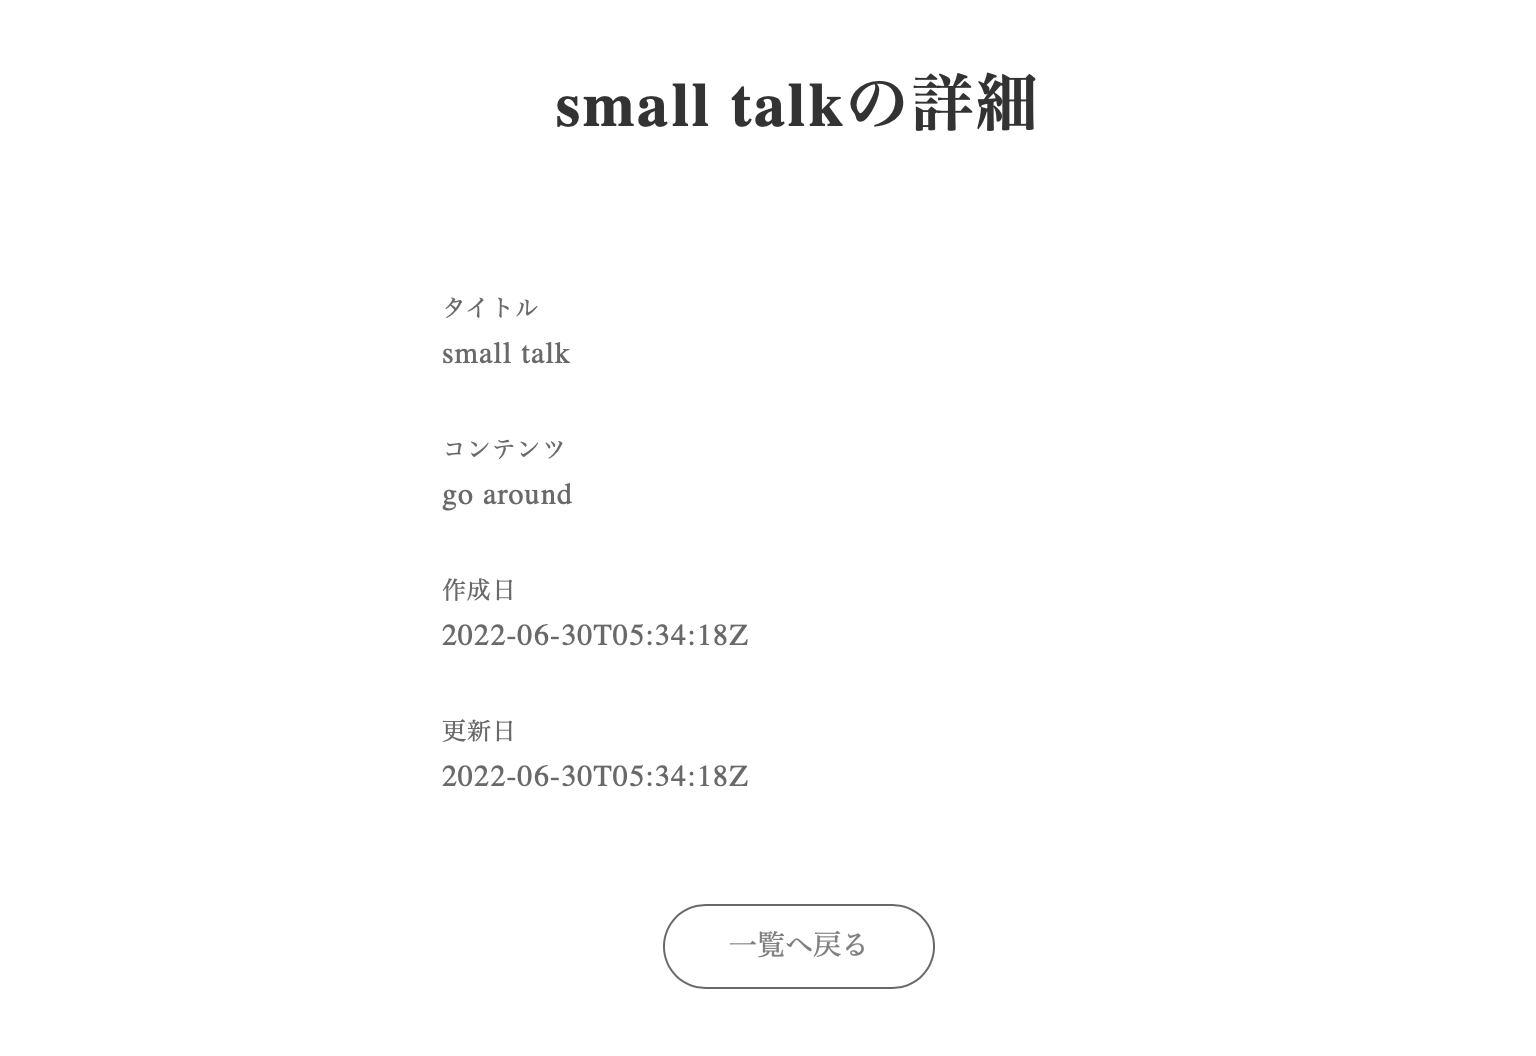
Postの詳細
postの詳細を表示するページを作成する。 これは将来的にはSSRして、Googleの検索に引っかかるようにする。
next.jsプロジェクトのindex.jsでpostのtitleを表示している箇所をLinkで囲む。
<Link href={`/posts/${post.id}`} color="gray" hoverColor="darkgray" style={{ textDecoration: 'underline' }}>
  <Text color="black" fontSize={[18, null, 21]} ml={6}>
    {post.title}
  </Text>
</Link>
このように、titleにリンクのアンダーバーが表示される。
記事詳細情報を叩くAPIの関数を作成する。 この関数はidを引数で受け取り、APIを叩く。
export const getPost = (id) => {
  if (!Cookies.get('_access_token') || !Cookies.get('_client') || !Cookies.get('_uid')) {
    return client.get(`/posts/${id}`)
  } else {
    return client.get(`/posts/${id}`, {
      headers: {
        'access-token': Cookies.get('_access_token') || '',
        client: Cookies.get('_client') || '',
        uid: Cookies.get('_uid') || '',
      },
    })
  }
}
詳細ページを作成する。[id].jsxはNext.jsの独特なファイルでDynamic Routingというやつである。
idにはどのような英数字も入る。
例えば、http://localhost:3000/posts/3やhttp://localhost:3000/posts/aliceなども[id].jsxが参照される。
touch pages/posts/\[id\].jsx
以下を書き込む
import Head from 'next/head'
import { useRouter } from 'next/router'
import { useState, useEffect } from 'react'
import { getPost } from '../../lib/api/post'
import { Text, Box, Link } from '../../atomic/'
export default function Post() {
const router = useRouter()
const [post, setPost] = useState()
const { id } = router.query
const handleGetPost = async () => {
if (id) {
try {
const res = await getPost(id)
if (res.status === 200) {
setPost(res?.data)
} else {
console.log('Something went wrong')
}
} catch (err) {
console.log(err)
}
}
}
useEffect(() => {
handleGetPost()
}, [id])
return (
<div>
<Head>
<title>{post?.title}</title>
<meta name="description" content={post?.content} />
<link rel="icon" href="/favicon.ico" />
</Head>
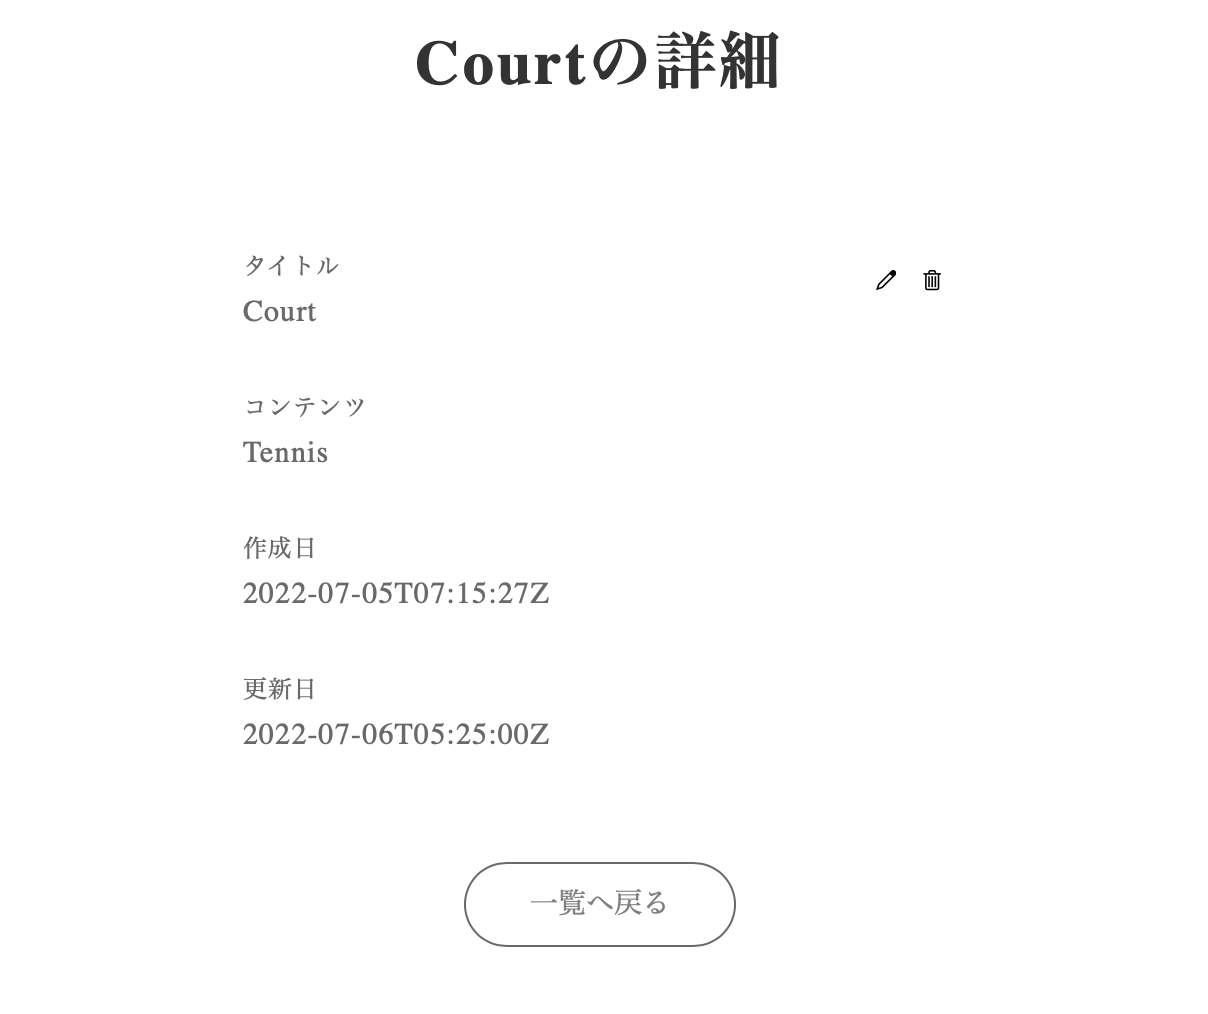
<Box as="main" mt={[60, null, 80]}>
<Text as="h1" textAlign="center" fontSize={[26, null, 36]} fontWeight={700} lineHeight={['26px', null, '36px']} letterSpacing={[1.3, null, 1.8]} color="#333">
{post?.title}の詳細
</Text>
<Box mt={[60, null, 90]} px={[16, null, 0]} width={['100%', 420]} mx="auto">
<Text fontSize={14} lineHeight="1.71" letterSpacing={0.7} color="dimgray">
タイトル
</Text>
<Text fontSize={18} lineHeight="1.71" letterSpacing={0.7} color="dimgray">
{post?.title}
</Text>
<Text fontSize={14} lineHeight="1.71" letterSpacing={0.7} color="dimgray" mt={30}>
コンテンツ
</Text>
<Text fontSize={18} lineHeight="1.71" letterSpacing={0.7} color="dimgray">
{post?.content}
</Text>
<Text fontSize={14} lineHeight="1.71" letterSpacing={0.7} color="dimgray" mt={30}>
作成日
</Text>
<Text fontSize={18} lineHeight="1.71" letterSpacing={0.7} color="dimgray">
{post?.createdAt}
</Text>
<Text fontSize={14} lineHeight="1.71" letterSpacing={0.7} color="dimgray" mt={30}>
更新日
</Text>
<Text fontSize={18} lineHeight="1.71" letterSpacing={0.7} color="dimgray">
{post?.updatedAt}
</Text>
</Box>
<Box display="flex" alignItems="center" mt={60}>
<Link href="/" width={[120, null, 160]} height={[44, null, 50]} borderRadius={[44 / 2, null, 50 / 2]} hoverShadow="silver" borderColor="dimgray" borderWidth={1} display="flex" alignItems="center" justifyContent="center" overflow="hidden" mx="auto">
<Text color="gray" fontSize={[12, null, 16]}>
一覧へ戻る
</Text>
</Link>
</Box>
</Box>
</div>
)
}
git add .
git commit -m "Create a post page"
Postの更新
記事のtitleとcontentを更新できるフォームを作成する。
基本的にはposts/newのページをベースに作成する。
CRUDのルーティング規則に則ったフォルダとファイルを作成する。
mkdir pages/posts/\[id\]
touch pages/posts/\[id\]/edit.jsx
先にAPIのupdateを叩くupdatePost関数を作成する。
export const updatePost = (id, params) => {
  if (!Cookies.get('_access_token') || !Cookies.get('_client') || !Cookies.get('_uid')) return
  return client.put(`/posts/${id}`, params, {
    headers: {
      'access-token': Cookies.get('_access_token') || '',
      client: Cookies.get('_client') || '',
      uid: Cookies.get('_uid') || '',
    },
  })
}
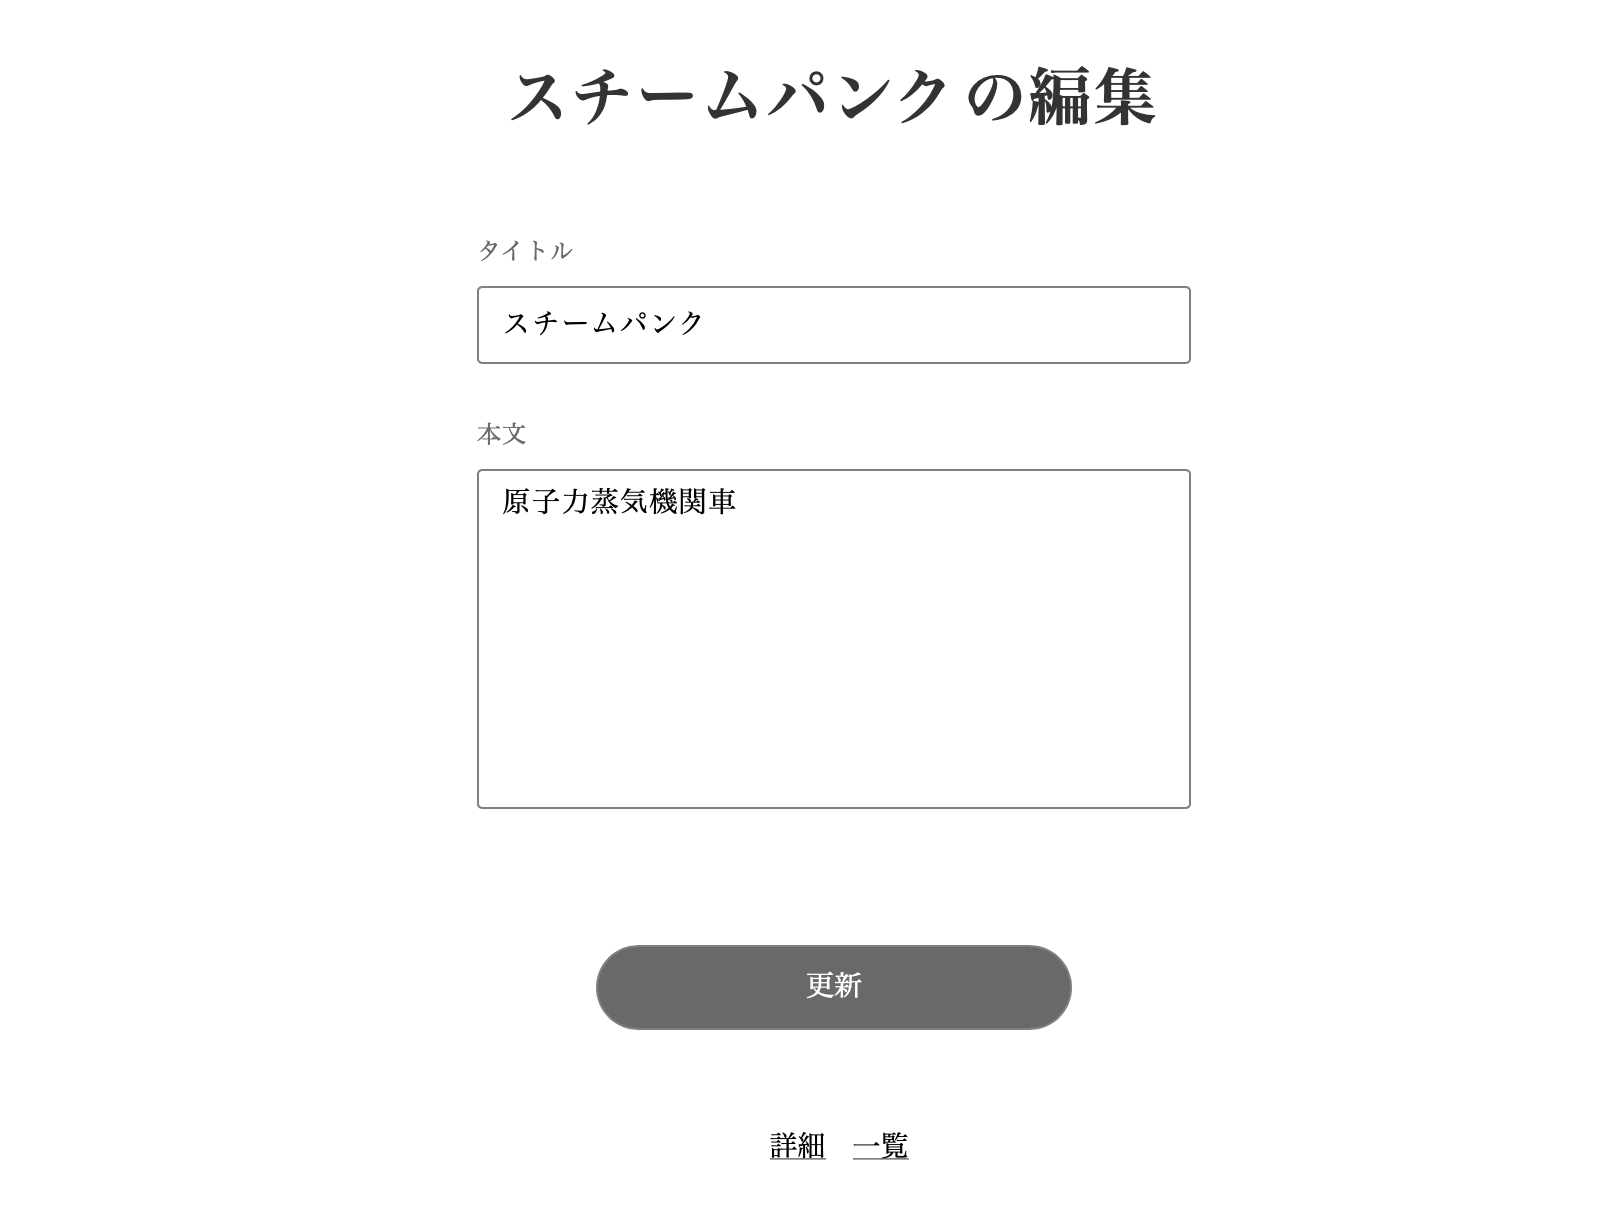
edit.jsx を開き、以下を書き込む。
import Head from 'next/head'
import { useRouter } from 'next/router'
import { useState, useEffect, useContext } from 'react'
import { useForm } from 'react-hook-form'
import { Text, Box, Clickable, Link, TextField, TextArea, ThreeDots, Alert } from '../../../atomic/'
import { getPost, updatePost } from '../../../lib/api/post'
import { AuthContext } from '../../_app.js'

export default function PostsNew() {
  const [animation, setAnime] = useState(false)
  const [notifications, setNotifications] = useState([])
  const [post, setPost] = useState()
  const router = useRouter()

  const createNotification = (message) => setNotifications([...notifications, { id: Math.random(), message }])
  const deleteNotification = (id) => setNotifications(notifications.filter((notification) => notification.id !== id))
  const { isSignedIn } = useContext(AuthContext)

  const {
    register,
    handleSubmit,
    watch,
    setValue,
    formState: { errors },
  } = useForm()

  const { id } = router.query

  const handleGetPost = async () => {
    if (id) {
      try {
        const res = await getPost(id)

        if (res.status === 200) {
          setPost(res?.data)
          setValue('title', res.data.title)
          setValue('content', res.data.content)
        } else {
          console.log('Something went wrong')
        }
      } catch (err) {
        console.log(err)
      }
    }
  }

  useEffect(() => {
    handleGetPost()
  }, [id])

  const onSubmit = async (data) => {
    if (!isSignedIn) {
      createNotification('投稿にはログインが必要です')
      return
    }

    const params = {
      post: {
        title: data.title,
        content: data.content,
      },
    }

    console.log(params)
    setAnime(true)
    try {
      const res = await updatePost(id, params)
      console.log(res)

      if (res.status === 200) {
        setPost(res?.data)
        createNotification('更新しました')
        console.log('Signed in successfully!')
      } else {
        console.log('some thig went wrong')
        createNotification('予期しない問題が発生しました')
      }
    } catch (err) {
      console.log(err)
      createNotification(err.response.data[0])
    }
    setAnime(false)
  }

  return (
    <div>
      <Head>
        <title>{post?.title}の編集</title>
        <meta name="description" content="新規ポスト作成" />
        <link rel="icon" href="/favicon.ico" />
      </Head>
      <Box as="main" mt={[60, null, 80]}>
        <Text as="h1" textAlign="center" fontSize={[26, null, 36]} fontWeight={700} lineHeight={['26px', null, '36px']} letterSpacing={[1.3, null, 1.8]} color="#333">
          {post?.title}の編集
        </Text>
        <Box mt={[40, null, 60]} px={[16, null, 0]} width={['100%', 420]} mx="auto">
          <Text fontSize={14} lineHeight="1.71" letterSpacing={0.7} color="dimgray">
            タイトル
          </Text>
          <TextField
            name="title"
            {...register('title', {
              required: true,
            })}
            height={46}
            width="100%"
            borderColor="gray"
            borderWidth={1}
            borderRadius={3}
            py={10}
            pl={14}
            fontColor="black"
            fontSize={16}
            letterSpacing={0.8}
            mt={8}
          />
          {'title' in errors && (
            <Text fontSize={12} lineHeight="22px" letterSpacing={0.6} color="red" mt={8}>
              {errors.title?.type === 'required' && 'タイトルは必須です'}
            </Text>
          )}
          <Text fontSize={14} lineHeight="1.71" letterSpacing={0.7} color="dimgray" mt={30}>
            本文
          </Text>
          <TextArea
            name="content"
            {...register('content', {
              required: true,
            })}
            height={200}
            width="100%"
            borderColor="gray"
            borderStyle="solid"
            borderWidth={1}
            borderRadius={3}
            py={10}
            pl={14}
            fontColor="black"
            fontSize={16}
            letterSpacing={0.8}
            mt={8}
          />
          {'content' in errors && (
            <Text fontSize={12} lineHeight="22px" letterSpacing={0.6} color="red" mt={8}>
              {errors.content?.type === 'required' && '本文は必須です'}
            </Text>
          )}
          <Clickable width={[220, null, 280]} height={[44, null, 50]} borderRadius={[44 / 2, null, 50 / 2]} bg="dimgray" color="white" hoverShadow="silver" borderColor="gray" borderWidth={1} display="flex" alignItems="center" justifyContent="center" overflow="hidden" mt={80} mx="auto" onClick={handleSubmit(onSubmit)}>
            {animation ? <ThreeDots bg="white" /> : <>更新</>}
          </Clickable>
          <Box display="flex" mx="auto" mt={[40, null, 60]} alignItems="center">
            <Link href={`/posts/${id}`} color="gray" hoverColor="darkgray" style={{ textDecoration: 'underline' }} mr={5} ml="auto">
              <Text color="black" fontSize={[13, null, 16]} ml={6}>
                詳細
              </Text>
            </Link>
            <Link href="/" color="gray" hoverColor="darkgray" style={{ textDecoration: 'underline' }} ml={5} mr="auto">
              <Text color="black" fontSize={[13, null, 16]} ml={6}>
                一覧
              </Text>
            </Link>
          </Box>
        </Box>
        <Box position="absolute" top="15px" right="20px">
          {notifications.map(({ id, message }) => (
            <Alert key={id} onDelete={deleteNotification} id={id}>
              <Box width={320} minHeight={50} borderRadius={7} border="1px solid silver" bg="ghostwhite" px={5.5} py={3} style={{ overflowWrap: 'break-word' }}>
                {message}
              </Box>
            </Alert>
          ))}
        </Box>
      </Box>
    </div>
  )
}
editページに飛ぶためのリンクをpages/index.jsとpages/posts/[id].jsx に追加する。
index.jsページでは新たにSvgコンポーネントをインポートし、JSX内のposts.mapしている箇所にabsoluteの属性を持つBoxでリンクを設置する。
import { Box, Text, Link, Svg } from '../atomic/'

...省略...

{posts.map((post) => {
  return (
    <Box position="relative" width={[380, null, 440]} height={[80, null, 120]} borderTopWidth={1} borderColor="gray" py={[16, null, 18]} px={[6, null, 8.5]}>
     <Box position="absolute" display="flex" top={[16, null, 18]} right={[6, null, 8.5]}>
       <Link display="flex" href={`/posts/${post.id}/edit`}>
         <Svg name="Edit" height={12} width={12} my="auto" />
       </Link>
     </Box>
...省略...
postページでは同じようにSvgコンポーネントをインポートし、jsxにEditへのリンクを追加する。
import { Text, Box, Link, Svg } from '../../atomic/'

...省略...

<Box position="relative" mt={[60, null, 90]} px={[16, null, 0]} width={['100%', 420]} mx="auto">
  <Box position="absolute" display="flex" top={14} right={[6, null, 8.5]}>
    <Link display="flex" href={`/posts/${post?.id}/edit`}>
      <Svg name="Edit" height={12} width={12} my="auto" />
    </Link>
  </Box>

...省略...

git add .
git commit -m "Create a post edit page"
Postの削除
CRUDの最後に記事の削除ボタンを作成する。 このボタンは一覧と詳細に設置する。
記事の削除は不可逆な処理なので、本来ならば確認などを挟むがここでは割愛する。
postのdestroy APIを叩く関数の作成。
export const destroyPost = (id) => {
  if (!Cookies.get('_access_token') || !Cookies.get('_client') || !Cookies.get('_uid')) return
  return client.delete(`/posts/${id}`, {
    headers: {
      'access-token': Cookies.get('_access_token') || '',
      client: Cookies.get('_client') || '',
      uid: Cookies.get('_uid') || '',
    },
  })
}
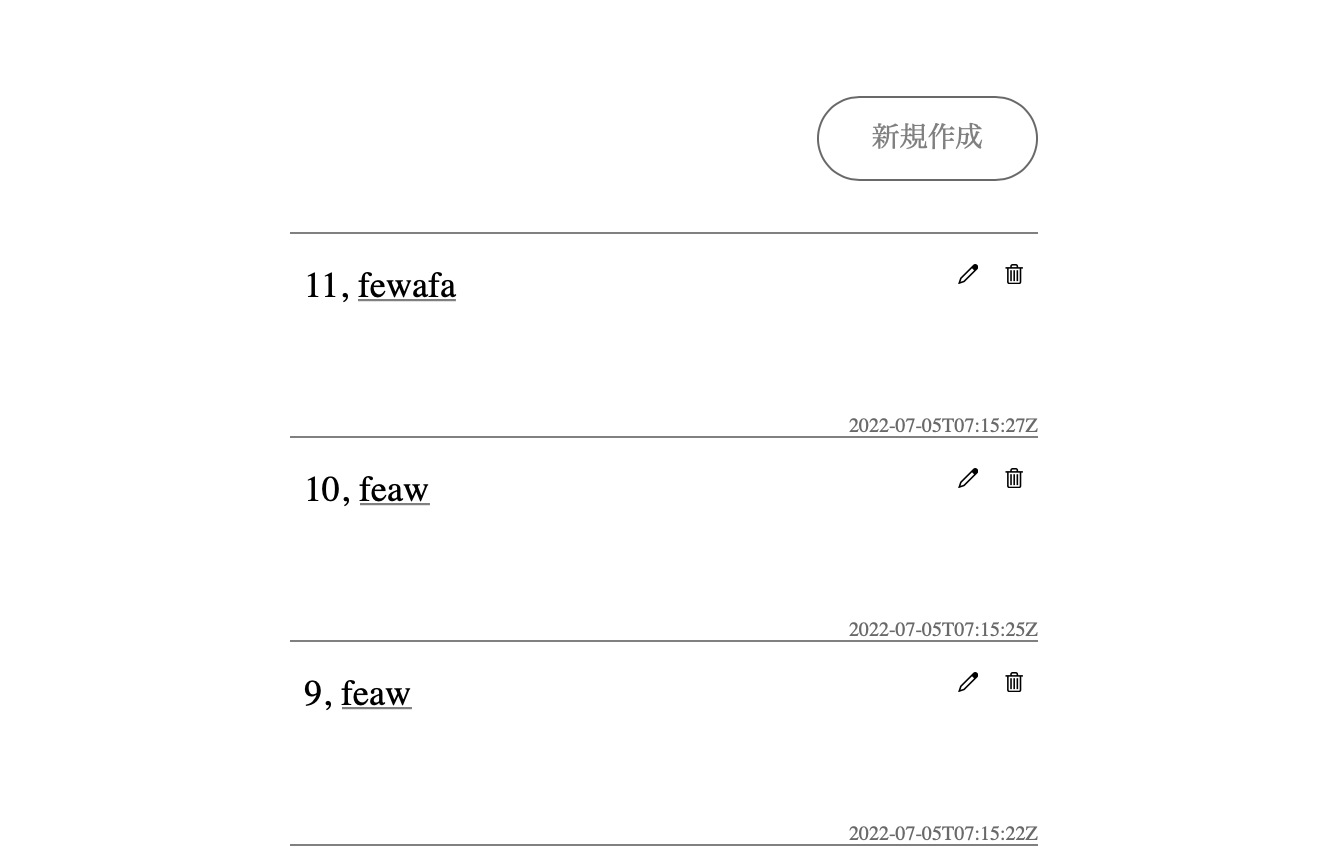
index.jsから削除処理を加えていく。 コードの冒頭でClickableコンポーネントと作成したdestroyPost関数をインポートする。
import { Box, Text, Link, Svg, Clickable } from '../atomic/'
import { getPosts, destroyPost } from '../lib/api/post'
handleDestroyPost関数はpostを受け取り、destroyPostを実行し、レスポンスステータスを見て、削除されていた場合はgetPostsで再取得しステートに収める。
  const handleDestroyPost = async (post) => {
    try {
      const res = await destroyPost(post.id)
      console.log(res)

      if (res.status === 204) {
        const res = await getPosts()
        setPosts(res?.data)
      } else {
        console.log('Something went wrong')
      }
    } catch (err) {
      console.log(err)
    }
  }
jsxの編集ボタンがある部分に削除ボタンを追加する。
<Box display="flex" position="absolute" top={[16, null, 18]} right={[6, null, 8.5]}>
  <Link display="flex" href={`/posts/${post.id}/edit`}>
    <Svg name="Edit" height={12} width={12} my="auto" />
  </Link>
  <Clickable onClick={() => handleDestroyPost(post)} display="flex" ml={15}>
    <Svg name="Trash" height={12} width={12} my="auto" />
  </Clickable>
</Box>
詳細画面にも削除ボタンを設置する。
コードはindex.jsと同じで、ClickableコンポーネントとdestroyPost関数をインポート。
import { getPost, destroyPost } from '../../lib/api/post'
import { Text, Box, Link, Svg, Clickable } from '../../atomic/'
handleDestroyPost関数を作成。 こちらでは削除が正常に処理されたら、トップページにリダイレクトする処理になっている。
const handleDestroyPost = async (post) => {
  try {
    const res = await destroyPost(post.id)
    console.log(res)

    if (res.status === 204) {
      router.push('/')
    } else {
      console.log('Something went wrong')
    }
  } catch (err) {
    console.log(err)
  }
}
jsxの編集ボタンの横に削除ボタンを追加。
<Box position="absolute" display="flex" top={14} right={[6, null, 8.5]}>
  <Link display="flex" href={`/posts/${post?.id}/edit`}>
    <Svg name="Edit" height={12} width={12} my="auto" />
  </Link>
  <Clickable onClick={() => handleDestroyPost(post)} display="flex" ml={15}>
    <Svg name="Trash" height={12} width={12} my="auto" />
  </Clickable>
</Box>
git add .
git commit -m "Create a post destroy function"
ここまでpostのCRUD処理全てが完成した。